Posted on

Can You Put Vinyl Decals on Textured Walls?

Vinyl wall decal applied smoothly to a lightly textured wall
how to

Can You Put Vinyl Decals on Textured Walls? (The Ultimate Fix)

Textured walls are the norm in a lot of homes, from light orange-peel drywall to heavier knockdown finishes, and it's one of the most common reasons people hesitate before buying a wall decal. The short answer is yes, vinyl decals can work on textured walls — but the outcome depends heavily on how deep the texture is and how much care you put into the application. Here's how to tell if your wall is a good candidate, and the techniques that make the biggest difference when it isn't perfectly smooth.

Vinyl wall decal applied smoothly to a lightly textured wall
A few ideas to get you started
  • Light textures like orange peel and knockdown generally work fine with standard vinyl decals.
  • Heavier textures (deep knockdown, stucco, popcorn) are much harder for vinyl to conform to and often lead to lifting edges.
  • Cleaning, drying, and gently warming the wall before application significantly improves adhesion on texture.
  • Applying heat during installation helps vinyl mold into small bumps and grooves.
  • Lifted edges on textured walls should be fixed quickly with heat and pressure, or a small dot of repositionable adhesive.

1. Know Which Textures Work and Which Don't

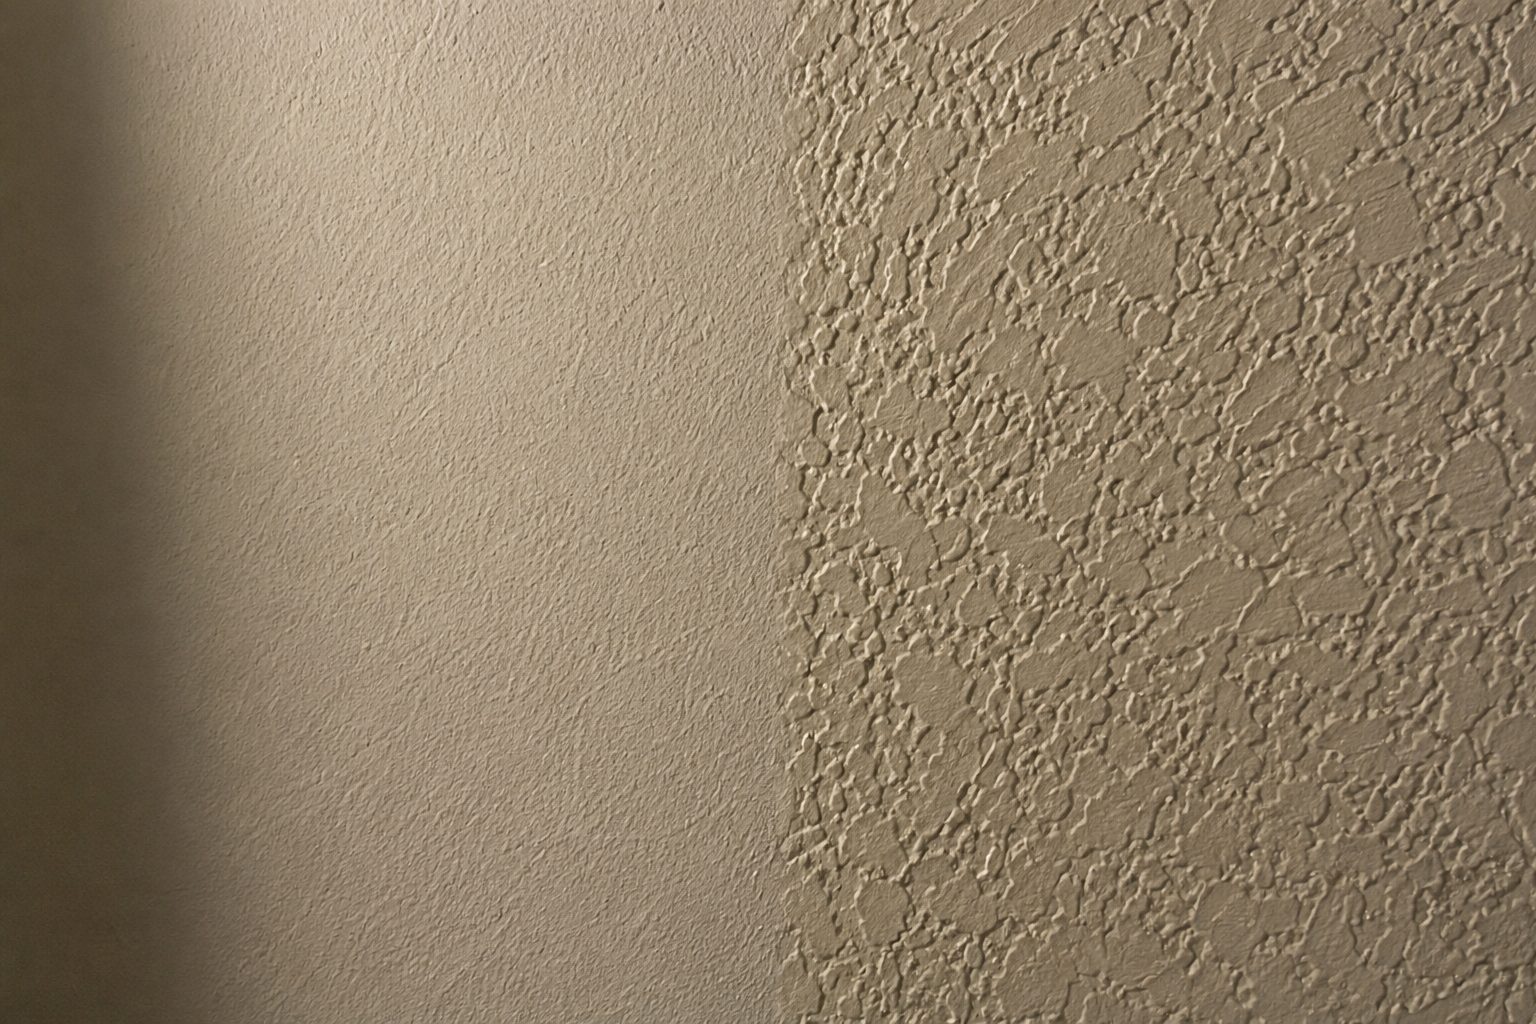
Not all wall textures are equal when it comes to decals. Light, shallow textures like orange peel and knockdown are generally manageable, since the bumps are small enough for vinyl to press into with some effort. Heavier or deeper textures — thick stucco, popcorn ceilings, deep knockdown, or raw brick and concrete block — are much tougher, because the peaks and valleys are too pronounced for a thin vinyl layer to fully conform to. Painted concrete block tends to do better than raw block, since paint smooths out some of the surface irregularity.

WHY IT WORKS

Matching your expectations to your actual wall texture prevents frustration and helps you decide whether standard application techniques will be enough, or whether you'll need extra steps.

STYLING TIP

Run your hand across the wall — if you can barely feel the bumps with your palm, it's a good candidate; if you can clearly feel ridges or valleys, plan on extra effort.

2. Clean and Prep the Surface Extra Carefully

Textured walls trap dust in their crevices more easily than smooth ones, so a quick wipe-down usually isn’t enough. Clean the wall with a damp cloth, working into the texture, and let it dry fully — this can take longer than it would on a flat surface, especially in humid conditions. Skipping this step is one of the fastest ways to end up with lifted edges later, since dust in the grooves prevents the adhesive from making full contact.

WHY IT WORKS

Textured surfaces have more hidden surface area for dust and residue to collect in, so thorough prep matters even more than it does on smooth drywall.

STYLING TIP

Let the wall air dry for longer than you think you need to — trapped moisture in texture grooves is a common cause of poor adhesion.

3. Use Heat to Help the Vinyl Conform

A hair dryer or heat gun on a low-to-moderate setting can make a real difference on textured walls. Gently warming the decal as you press it into place softens the vinyl slightly, helping it mold into small bumps and grooves instead of bridging over them, which is what causes lifting later. Work in small sections, applying heat for a few seconds and then pressing firmly with a squeegee or your fingers before moving to the next area.

WHY IT WORKS

Warm vinyl is more pliable and better able to follow the contours of an uneven surface, which improves contact with the adhesive and reduces the chance of edges peeling up over time.

STYLING TIP

Keep the heat source moving constantly and hold it a few inches away — concentrated heat in one spot can warp the vinyl or affect the print.

4. Press Firmly and Work in Small Sections

On textured walls, working in small sections matters even more than usual. Peel back just an inch or two of the backing at a time, press that section firmly with a squeegee or the edge of a card, and move on. For deeper texture, going over each section two or three times with firm, even pressure helps push the vinyl further into the grooves rather than letting it sit on top of the high points only.

WHY IT WORKS

Repeated, firm pressure over small areas gives the adhesive more opportunities to fully contact the low points of the texture, not just the raised surface.

STYLING TIP

A firm plastic squeegee generally works better than a soft cloth on texture, since it can apply more concentrated pressure into the low spots.

5. Fix Lifted Edges Quickly

Even with careful application, small edges or corners can lift on textured walls over the following days, especially around deeper grooves. Catch this early: warm the lifted section with a hair dryer for about 20 seconds and press it firmly back into place. If it still won’t hold, a very small amount of repositionable craft glue applied under the edge with a toothpick can secure it without damaging the decal. Avoid touching or adjusting the decal unnecessarily for the first 24 hours while the adhesive continues to bond.

WHY IT WORKS

Addressing lifted edges immediately prevents them from getting worse, and full adhesive strength typically isn't reached for a couple of days, so early support helps the bond set properly.

STYLING TIP

Check corners and edges once a day for the first few days after installation, since that's when most texture-related lifting shows up.

6. Consider Fabric-Style Decals for Heavier Texture

If your wall has a pronounced texture and standard vinyl still isn’t holding well after trying the techniques above, a softer, more pliable decal material can be worth exploring. Fabric-style, repositionable decals tend to flex more easily across uneven surfaces than stiffer vinyl, which can make them a better match for walls with deeper grooves or bumps. Availability of specific materials varies by product, so check individual listings for material options.

WHY IT WORKS

Softer, more flexible decal materials can follow the contours of a textured wall more readily than rigid vinyl, reducing the lifting that heavier textures tend to cause.

STYLING TIP

If you're unsure which material will suit your wall, testing on a small, inconspicuous section first can save you from a larger redo.

A Few More Things to Keep in Mind

Avoid applying decals to freshly painted textured walls — give the paint at least 30 days to fully cure first, since curing paint can prevent proper adhesion. Keep the area dry after installation, since moisture is especially problematic in the crevices of textured surfaces. And if a wall has extremely heavy or deep texture, it’s worth testing a small, inexpensive decal or an inconspicuous spot before committing to a large design.

Frequently Asked Questions
Can vinyl decals stick to textured walls?

Yes, in most cases, though it depends on how deep the texture is. Light textures like orange peel and knockdown generally work well with some extra care, while heavier textures like deep stucco or popcorn finishes are much more challenging for vinyl to conform to.

Will decals fall off textured walls over time?

They can, especially at edges and corners on heavier textures, if the wall wasn’t properly cleaned and prepped or if heat wasn’t used during application. Catching and fixing any lifting early usually prevents it from spreading.

Does using a hair dryer really help decals stick to textured walls?

Yes — gentle heat softens the vinyl slightly, making it more pliable so it can press into small bumps and grooves rather than bridging over them, which improves overall adhesion.

Are fabric decals better than vinyl for textured walls?

Fabric-style, repositionable decals tend to be more flexible than standard vinyl, which can help them conform to uneven surfaces more easily. Whether this is the better choice depends on the specific product and how deep your wall’s texture is.

How long should I wait after texturing or painting a wall before applying a decal?

It’s best to wait at least 30 days after painting or texturing before applying a decal, since the surface needs time to fully cure for the adhesive to bond properly.

What should I do if a decal's edge starts lifting on a textured wall?

Address it right away — warm the lifted section with a hair dryer for about 20 seconds and press it firmly back into place. If it still won’t hold, a small dot of repositionable craft glue under the edge can help secure it.

READY TO UPDATE YOUR WALLS?

Not sure which decal will work best on your wall? Browse our wall decal collection and check individual product details for material options suited to your surface.

Explore designs

Posted on

How to Apply Wall Decals Without Bubbles (Step-by-Step Guide)

Applying a wall decal smoothly without bubbles using a squeegee
how to

How to Apply Wall Decals Without Bubbles (Step-by-Step Guide)

Air bubbles are the most common complaint people have after installing a wall decal, and almost all of them come down to the same few causes: a wall that wasn’t fully clean or dry, rushing the backing removal, or pressing from the wrong direction. None of these are hard to avoid once you know what to watch for. This guide walks through the full process, from prepping the wall to smoothing out the last stubborn air pocket, so your decal goes on flat and stays that way.

Applying a wall decal smoothly without bubbles using a squeegee
A few ideas to get you started
  • Clean and fully dry the wall before doing anything else — dust and moisture are the top causes of bubbles.
  • Peel the backing off gradually instead of all at once, and press as you go.
  • Always smooth from the center of the decal outward toward the edges, never edge to edge.
  • A squeegee, credit card, or similar flat tool gives better results than your hand alone.
  • Small bubbles that remain after installation can usually be popped with a pin and pressed flat.

1. Clean and Dry the Wall Thoroughly

Start by wiping the wall down with a damp microfiber cloth to remove dust, grease, and any residue, then let it dry completely — this can take longer than expected depending on humidity. Even small amounts of dust act like tiny bumps under the decal, and moisture prevents the adhesive from bonding properly, both of which lead to bubbles later. If the wall was recently painted, wait at least two to three weeks before applying a decal, since fresh paint continues to off-gas and cure during that time.

WHY IT WORKS

A clean, dry, fully-cured surface gives the adhesive an even bonding surface with nothing trapped underneath.

STYLING TIP

Avoid using soap-based cleaners on the wall right before application — plain water is usually enough and won’t leave a residue that affects adhesion.

2. Plan and Mark the Placement Before Peeling Anything

Decide on the exact position before you expose any adhesive. Hold the decal up to the wall, or tape it lightly in place, and step back to check the placement from a distance. Use a level along one edge to make sure it’s straight, and lightly mark the position with a pencil if it’s a large or multi-piece decal. This step matters because most decals are difficult to reposition once fully applied, and rushing placement is one of the main reasons people end up redoing the whole job.

Cleaning a wall with a microfiber cloth before applying a wall decal
WHY IT WORKS

Confirming placement first avoids the biggest cause of do-overs and reduces the handling that can introduce dust or fingerprints under the adhesive.

STYLING TIP

Step back and view the taped decal from across the room, not just up close, since perspective changes how centered or level it looks.

3. Peel the Backing Gradually, Not All at Once

Rather than removing the entire paper backing before touching the decal to the wall, peel back only the first few inches, press that section into place, and then continue peeling and pressing in stages. This keeps the exposed adhesive from touching itself or picking up dust while you work, and gives you much more control over alignment as you go.

WHY IT WORKS

Working in small sections keeps you in control of the decal the whole time, which is where most bubbles and wrinkles are prevented rather than fixed after the fact.

STYLING TIP

For large decals, ask someone to help hold the unpeeled portion steady while you apply the exposed section.

4. Smooth from the Center Outward

As each section of the decal touches the wall, use a squeegee, credit card, or similar flat-edged tool to press it down, always working from the center of that section toward the edges. This pushes trapped air out ahead of the tool rather than sealing it in the middle. Use firm, even strokes rather than pressing especially hard in one spot, and go over each section more than once.

WHY IT WORKS

Air can only escape through an edge, so working outward from the center gives it somewhere to go instead of trapping it under the vinyl.

STYLING TIP

Wrap the squeegee edge in a soft cloth if you’re worried about scratching a textured or delicate decal surface.

5. Remove the Transfer Tape Slowly and at an Angle

If your decal uses a clear transfer film on top, wait until the whole design is fully pressed onto the wall before removing it. Peel it back slowly at a low, shallow angle rather than pulling straight up, and go one small section at a time. If any part of the decal starts lifting with the tape, stop, press it back down, and re-run the squeegee over that spot before continuing.

WHY IT WORKS

A shallow peeling angle keeps the adhesive bond between the decal and the wall stronger than the bond between the decal and the transfer tape, so the design stays put.

STYLING TIP

Peel toward yourself at a low angle rather than up and away — it gives you more control if a section needs to be pressed back down.

6. Fix Any Remaining Small Bubbles

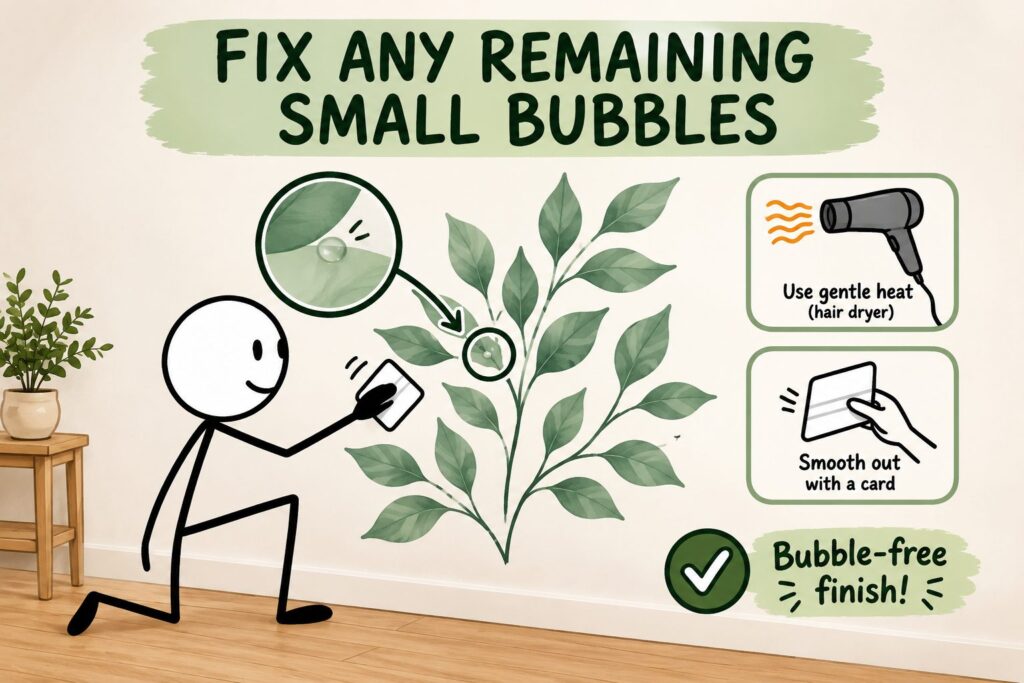
If a small bubble is still visible after installation, don’t try to push it out toward the nearest edge, since that can wrinkle the decal. Instead, use a pin or fine needle to make a tiny puncture in the bubble, then press the air out gently with a fingertip or soft cloth. For a bubble that won’t flatten, a hair dryer on a low, warm setting can soften the vinyl slightly and make it easier to press down smoothly.

Marking wall decal placement with a level before applying
WHY IT WORKS

A pinprick lets trapped air escape without disturbing the surrounding design, and gentle heat makes vinyl more pliable so it settles flat.

STYLING TIP

Keep the hair dryer moving and on a low setting — concentrated heat can cause the vinyl to warp or the adhesive to overheat.

A Few More Things That Help

Apply decals in a room with moderate temperature and humidity — extreme heat or cold can affect how the adhesive behaves. Avoid textured or heavily uneven walls, since decals are designed for smooth surfaces and are more likely to bubble on stucco, brick, or heavily textured paint. And if you’re working with a large or multi-panel decal, having a second person to help hold and align sections makes a noticeable difference in the final result.

Frequently Asked Questions
Why do wall decals bubble after installation?

Bubbles usually come from dust or moisture trapped under the decal, peeling the backing off too quickly, or pressing from the edges inward instead of the center outward. Careful surface prep and a gradual application process prevent most bubbles from forming in the first place.

Can I fix a wall decal that already has bubbles?

Small bubbles can often be fixed with a pin prick to let the air out, followed by gentle pressure to flatten the spot. For a decal with many bubbles or wrinkles, it may be easier to carefully peel it up and reapply it using the center-outward smoothing method.

What tools do I need to apply a wall decal without bubbles?

A squeegee or a flat-edged tool like a credit card, a level, a pencil for marking placement, and a clean microfiber cloth for prepping the wall are usually all you need. A hair dryer can help with any stubborn bubbles afterward.

How long should I wait after painting before applying a wall decal?

It’s best to wait two to three weeks after painting. Fresh paint continues to cure during this time, and applying a decal too soon can lead to poor adhesion or paint pulling away later when the decal is removed.

Do wall decals work on textured walls?

Wall decals are designed for smooth, flat surfaces and generally don’t adhere well to heavily textured walls like stucco or popcorn ceilings, since the adhesive can’t make full contact with the surface. Lightly textured walls may work but are more prone to bubbling.

Can I reposition a wall decal once it’s on the wall?

Many decals can be gently peeled up and repositioned shortly after application, though this becomes harder the longer the adhesive has had to set. It’s best to confirm placement before applying rather than relying on repositioning.

READY TO UPDATE YOUR WALLS?

Ready to give a wall a fresh look? Browse our removable wall decal collection and follow this guide for a smooth, bubble-free application.

Explore designs